How to Apply Fake Eyelashes for the Holidays!
Applying eyelashes is very simple once you have a little bit of practice. In this tutorial I will explain step by step how to apply False Lashes. Lashes can make your eyes go from drab to fab with just a little effort!
Tools you will need:
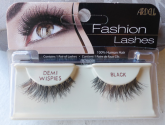
False Full Strip Eyelashes (I am using Ardell Demi Wispies, found in drugstores)
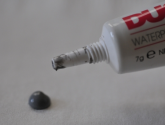
Lash Adhesive (I am using DUO Dark Tone Lash Adhesive, found in drugstores)
Tweezers
Optional Tools:
Liquid Eyeliner or a Dark Eyeshadow
Small brush (eyeliner brush, angled liner brush, smudge brush, etc.)
Where to start?
Applying false lashes will be the last step of your eyes. So, make sure to prime your eyes with an eyeshadow primer, apply your eyeshadow and eyeliner & you’ll be ready to apply your false lashes!
Why apply them last?
You apply false lashes last because you want your lashes to be very black and clean of any eyeshadow or other products. If you apply them first, you may have lashes that are full of eyeshadow. If you’d like, you can apply a thin coat of mascara beforehand. But it’s not necessary. I like having a thin coat of mascara on my lashes before I apply false lashes.
Step 1:
Take your false lashes out of the box. Using your tweezers (or fingers), gently peel the lashes off of the tray. You don’t want to apply too much pressure, or else you may bend or damage the band.
Step 2:
Using your pointer finger and thumb, you want to hold both ends of the eyelashes at the bottom band. Lightly move both of your hands up and down a centimeter or so. Doing this will stretch the band so it isn’t as stiff. This will help the lashes sit better on the contour of your eyelid. (Think of it as stretching a balloon before you blow it up)
Step 3:

Now we are going to test the lashes to see if they are the correct length for your eye shape. If you have smaller eyes, you may need to cut a little bit. Pick up the according eyelash to you eye. The shortest part of the lashes should be matched up near your tear-duct. The longest part should be at end. The way you will set them on your eyelid is with the curl facing up. Set the lashes down in the middle of your lashline. Look to see where your natural lashes start (inner corner) and pull the false lashes to the same spot. Look to see if the band extends farther out (outer corner) than your natural lash line. If it extends out longer, grab the end with your thumb & pointer finger and lift them off
Step 4:
With your scissors, cut off any excess lashes. (Set it on your lash line again to see if you cut enough)
Step 5:
Squeeze a little dab of lash adhesive on a clean surface. Don’t apply it from the tube directly to the lashes. A lot of product comes out at once and you don’t want to damage the lashes.
Step 6:
Using any tool you’d like for precise application of the glue, (many like to use a toothpick or the opposite side of the tweezers. I’m using the opposite corner of the lash adhesive tube) pick up the glue up. Don’t worry it’s too much. You don’t want it to be too little, otherwise your lashes might not stick well.
Step 7:
Pick your lashes up with your fingers or your tweezers and drag the glue across the band of the lashes. Apply a little more to each end of the lashes, as they are the spots that tend to wear off.
Step 8:
Pick the lashes up with a tweezer, holding them in the middle – close to the band but not touching the glue.
Step 9:
It’s difficult to apply lashes while looking straight forward into a mirror. The easiest way is by sitting down or standing up and tilting your head back a little – so when you look forward, your eyes are slightly squinted. This way, you’ll be getting a better view of your lashline. Like you did in Step 3, set the lashes down on your eyelid as close as possible to the base of your natural lashes, but not touching them. They should be on your eyelid, not your lashes. Make sure they are lined up with the start of your natural lashes before you press them down on your skin.
Step 10:
Once the lashes are lined up with your lashes, grab the beginning of the lashes with your tweezers and press it down on your lid. Again, make sure they are lined up with the start of your natural lashes. You don’t want them to be any closer to your tear-duct, or it may cause your eyes to water or a pinching sensation. There should be a small space. Grab the outer end and press it down on your skin. Work Quickly before the glue sets.
Step 11:
Go along the whole band, pressing it down onto your skin with the tweezers.
Step 12:
To make sure it’s very secure, use a brush (smudge brush, eyeliner/brow brush, etc) or sponge applicator and go across the band again pressing it down on your skin.
Step 13:
Wait patiently for 1-2 minutes while the adhesive dries completely.
Step 14:
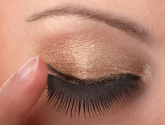
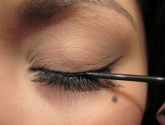
For this step, you can use eyeliner (liquid/pencil or gel) or a dark eyeshadow (brown, black, etc). If you’re using an eyeshadow, take a small smudge brush and smudge the shadow on your lid, close to your lashline – blending it into the band of the false lashes. This will blend in the band better as well as cover up any adhesive you may have gotten on your eyelid. If you’re using a liquid liner, line your eyes as you normally would – against the band of the lashes.
Step 15:
Apply a coat of mascara to your lashes, starting at the base of your natural lashes all the way up to the end of the false lashes. This will blend your natural lashes in better with the false lashes as well as make the lashes look darker.