Makeup How To: The Smokey Eye

by Lauryn Salzwedel

smokey eye
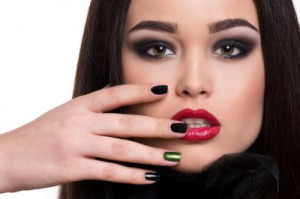
The Smokey eye is easily one of the most coveted and difficult looks to master when it comes to makeup artistry.  Smokey eyes are iconic and have been popular among the masses for decades.  The Smokey eye effect is simultaneous with mystery, intrigue, sex appeal, and drama.  It takes a special personality to be able to pull it off; it is certainly not for those who shy away from attention grabbing makeup.  There is a delicacy to the Smokey eye and it can easily be overdone if not applied properly or with the right color palette.

As a makeup artist the Smokey eye is easily the most commonly asked for eye makeup look I do.  Not because I am the best there ever was at it, but because it can be intimidating to those who do not wear a lot of makeup, or who have never tried it.  Smokey eyes can often be associated with some less high regarded personalities, so the trick is finding the right balance for everyone.

But where do you start, and what do you use?  The options are endless to be completely honest and the makeup industry is only continuing to add more.

The first question you need to ask yourself is: How Dramatic Do I Want My Makeup to Be?  Smokey eye makeup does not mean you have to go uber-dark.  Smokey eye makeup is an effect, not a color palette.  The color palette is up to you, take a sigh of relief!  I love makeup palettes that give me anywhere from 3-15 shadow options in one easy compact.  This allows me to cater to everyone individually, and gives a huge range of intensity choices.  Many clients of mine are not regular eye shadow wearers, so are leery of doing a Smokey eye to begin with.  There’s no rule that says you cannot do a gorgeous Smokey eye with neutral, earthy tones!!  This is usually music to my client’s ears, so to speak, because they won’t have to worry about feeling odd in their own skin.  Craving a little more drama for a night out or a special occasion is normal, but that doesn’t mean you have to use jet-black shadow with jet-black liner.  The key is to find what level of drama you are comfortable with, and play!

I use warm brown shadows more often than not for my clients, especially the brides.  You need at least 3 shades of the color you choose to go with…a light one for highlighting, a medium one for the entire lid, and a deep one for the crease—which is what creates the Smokey effect!  If you want to get really intricate, use a medium-deep shade with a fluffy blending brush over the deeper crease color after you’ve applied it.  This blends everything smoothly, and any good Smokey eye is devoid of harsh lines.  It’s the difference between a professional look and a beginner.   Liner can be anything from a soft brown to blackest black, or if you want really natural but still the liner effect: wet a liner brush and apply the crease color shadow as liner!

Petal Beauty Eye Medium Angle Shading makeup Brush (PE-F0M)

Petal Beauty Eye Large Fluff makeup Brush (PE-S0B)

I always start with the medium shade, which is applied all over the entire lid from the outer corner, working your way inward.  Now, if you read that right you might be thinking that is backwards and unnatural.  But, all great makeup artists know that you want maximum color deposit on the outer corner of the eye, not the inner corner.  Thus, you start at the outer corner and blend inward, since the brush has the most product on it when you first begin to apply!!  I use a standard shading brush shaped like the one pictured on the left.

From there, I apply the lightest color from the crease of the eyelid all the way to base of the brow.  This will create a lifted effect on the eye, giving the appearance of youth, yay!!  I like to use a larger shadow brush for this like the one pictured on the right


You also want to bring the same color you use as a highlight for the brow in the very inner corner of the eye.  This brightens everything, making you appear to be more awake, which is a great trick if you’ve had a long night before as well!

The last step is the crease.  Start small, with minimal product, and build from there.  That way you don’t feel like you have to take all the shadow off and start completely over.  You can always add more, that’s what I tell my clients.  I always tap the excess shadow off the brush before I apply to the crease as well to avoid fallout on the top of my cheeks!  Again, you want to start at the outer corner and work your way inward.  Blend, blend, blend!!  It is so important, I cannot stress that enough.  Even if you think all the product is off the brush, go over the area again to blend the shadow together to avoid a harsh line.  Use a crease brush, to make life easier and get a more precise application for the crease because of the way it is shaped.

I always do the liner at the very end, but there’s nothing that says you can’t use it in the beginning of the application and re-apply once you are finished to create more drama. Again, start at the outer corner and work your way to the inner corner to create more precision with the line. It’s also important to get as close to your lash line as possible so everything blends nicely. If you choose to user shadow as a liner, or a cream liner, use a liner brush. Mascara should always be the finishing touch to make lashes POP!


This is a gorgeous makeup look that will always be trendy, so give yourself time to practice and remember: an artist is only as good as the tools she uses!!

April 7, 2014

Leave a Reply

Your email address will not be published. Required fields are marked *